How to add any Z-Wave Devices to HomeKit
People are in the hype of turning their homes into automated smart home systems. However, the questions arise when adding smart home devices into different home systems. Controlling Z-Wave devices through Apple HomeKit is one such popular question.
So, can it be done?
Yes! HomeKit and Z-Wave can work peacefully together. You can connect these two with the help of a hub.
Imagine that you can turn off your lights and check if the front door is locked without even having to get out of bed. Sounds cool right? Let’s dwell on it and find out more!
What do you need to integrate Z-Wave with HomeKit?
If you are planning to connect all your Z-Wave devices to HomeKit, all you need is a single hub. It works like a control centre that you can command. And still, you can also add this hub to the Apple Home application.
There are many hubs and methods that would work well with the Z-Wave devices. There’s no need to Think-A-Lot. The best options that we recommend are,
These HomeKit-compatible Z-Wave hubs and methods are solid options that will work smoothly.
But if you are thinking about getting a different hub, make sure that it is compatible with both HomeKit and Z-Wave.
Can Z-Wave work with Apple HomeKit?
Answering this question in short, yes. Z-Wave devices work with wireless technology where they can be connected. So, you can control them from pretty much any available smart home panel.
Z-Wave uses mesh network technology. This means that all the devices are interconnected like a mesh, and they can communicate with each other. If you are one of those Apple fans, you can use these devices with Apple HomeKit and control them using Siri voice commands.
It’s easy as ‘Hey Siri, turn on the speaker.’ We all know how easy it is to handle things just with voice commands. And that’s no longer an imagination.
Adding Z-Wave devices to Apple HomeKit using Enomek
This is one of the highly recommended solutions to add Z-Wave devices to Apple HomeKit. It is an app that provides you guidelines for connecting these two. For all the new smart home users, this application is valuable. Enomek can be also used to integrate Sonos HomeKit, Vivint HomeKit, eWeLink and many other compatible devices.
Step guide for Enomek App Installation
This is a web-based application, and you can follow their step-by-step guides to add any smart home device to HomeKit including Z-Wave. Here are the steps that you have to follow:
- Download and install the Enomek app.
- Open the application.
- Click on the ‘Add To Home’ button once you have found the brand name ‘Z-Wave’ from the list.
- All the methods that are available to add Z-Wave to HomeKit will be displayed under this.
- Select any of the methods of your choice and follow the given instructions carefully.
Adding Z-Wave devices to Apple HomeKit using Athom Bridge
Athom Bridge is a plug-and-play hub that connects Z-Wave and HomeKit by creating a bridge. It can add up any non-compatible device to Apple HomeKit. This advanced smart home hub is easy to use, controlled and automated.
From the two types of Athom Bridges, we recommend the Athom HomeKit Homebridge server. The process of connecting Athom Bridge and Z-Wave is easy and can be done with a few steps,
- Take out the pre-flashed SD card from the Athom Bridge packaging.
- Place it inside the server of the hub.
- Connect the server to the internet using the given cable.
- Turn the hub on.
- Find out the IP address of the server with the help of the router.
- Enter the IP address and port 8581 on the machine as mentioned below:
http://192.168.4.12:8581 - Enter the login details.
- Select the Z-Wave plugin and install it.
- Complete the configuration settings once logged into the server.
Adding Z-Wave devices to Apple HomeKit using Thinka Hub
There are a few major steps that you should follow carefully to do the Z-Wave Thinka HomeKit integration. It is an easy process that could be done in a few minutes. So don’t worry.
Registering Thinka Z-Wave
This is the first step of the process. Power up the Thinka Z-Wave hub by plugging it into a power source. Then connect it to the internet with the provided Ethernet cable.
- From a browser, go to https://setup.thinka.eu/ and register the hub.
- Add the serial key of the Thinka Z-Wave hub and click on the Lookup Thinka button.
- Follow the instructions given to complete the registration process.
- Then, follow the instructions given to complete the registration process.
Adding Z-Wave Devices to Thinka app
- Download the Thinka Setup App from the App Store.
- Launch the app and select your Thinka device from the Available Thinkas page.
- Scan the QR code of the Z-Wave device that you want to add.
- The app will find the device and add it to the app. This process takes around 10 minutes, and it is an automated process.
- Once the device is added, it can also be seen under the Thinka web client UI.
- Find the device under the Provisioning list in the Manage Provisional List section in the Z-Wave Settings.
- Name the device and enter a Room name where the device is placed. Make sure the room name is similar to that of HomeKit.
Connecting Z-Wave to the Home App
After the addition of the Z-Wave device to the hub, you have to add the hub to the Home App. Follow the steps below to complete this.
- Go to the Thinka Setup App and click on the Thinka Hub that you want to add to HomeKit.
- Choose the home that you wish to add the Thinka Z-Wave in HomeKit.
- Enter the HomeKit PIN. This can be found on the Thinka device when prompted.
And that’s it! You can now use the Thinka Z-Wave devices through HomeKit. All the devices connected to the hub will be automatically added to the Apple Home app.
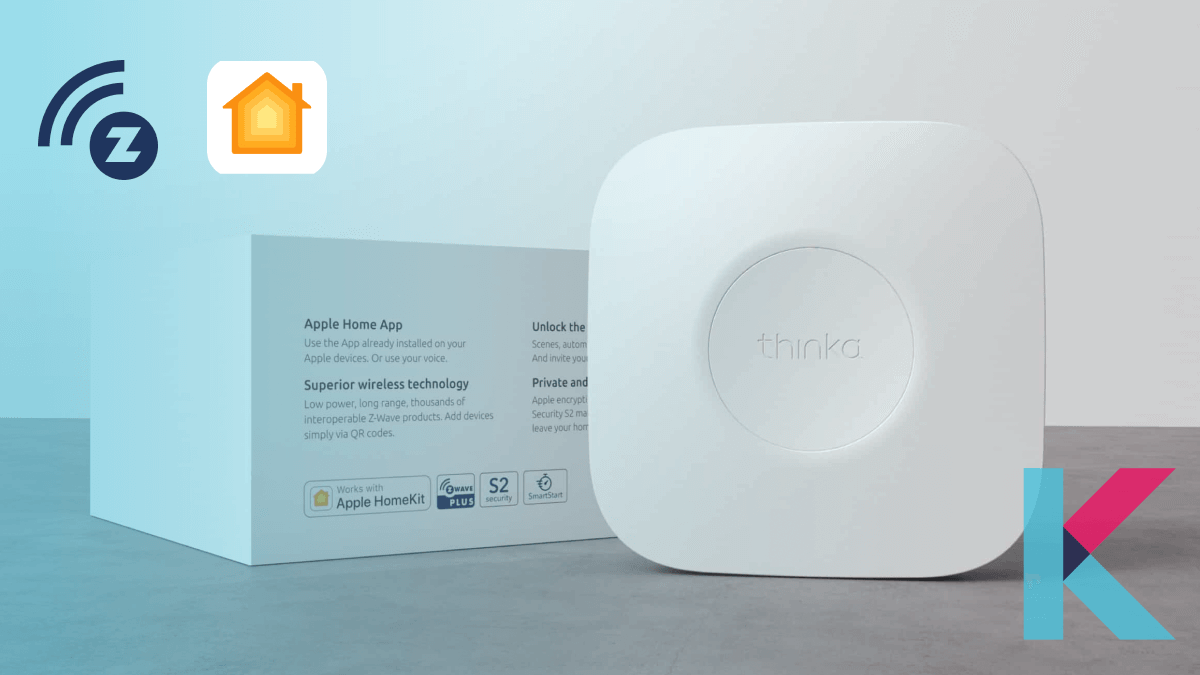
Little about Thinka Z-Wave Hub
When it comes to Z-Wave HomeKit connecting, Thinka Z-Wave HomeKit is so far the best combination.
While Thinka is just another hub in many ways, it is a little different from others. It works with Apple HomeKit and it’s a Z-Wave hub that uses Z-Wave Plus. It also has a smart start option. Thinka also works with Amazon and Google.
Settings for the hub have to be done through a browser-based interface. Setting up and adding devices processes are easy to follow.
Advantages of the Z-Wave HomeKit bridge
Integrating Z-Wave devices with HomeKit lets you control everything within a single platform. This means that you don’t have to juggle with many applications. And you can also use Siri voice commands to voice control these devices.
Yes, you heard it right. Just with ‘Hey Siri’ you can do so many things!
And there’s no need to get used to different home systems to use Z-Wave devices. If you are glued to Apple HomeKit, that’s completely fine! You can use the same old skills on all of your Z-Wave devices.
Integration of Z-Wave devices to HomeKit opens up a whole new level of smart home systems. Your lazy self will thank us later if you try this out.
Are there any drawbacks?
Well, everything has two different sides. So if you want to control Z-Wave devices through HomeKit, keep your heads-up on these.
The first thing is that you need the help of the hub to connect these two. This means that you will have to spend a little more on it. But the good news is that you can buy a hub for a cheaper price if needed. And it will still work as perfectly as the expensive ones.
And there’s nothing worse about syncing these two. It will be worth it.
Z-Wave devices are compatible with HomeKit and you will need a hub to connect these two. And there are some configurations that you need to follow in the Apple HomeKit app. The entire process is worthwhile as it can bring so many perks to a smart home ecosystem. We recommend you try it and see what’s all about it.
FAQs about Z-Wave HomeKit
1 Are there any good Z-Wave HomeKit bridges?
Yes, the Thinka Z-Wave, Athom Bridge, and Hubitat Elevation Hub are HomeKit-compatible.
2 Do Z-Wave switches need a hub?
To get the most out of Z-Wave devices, you need a Z-Wave-certified hub.
3 Can I use Z-Wave without Wi-Fi?
Yes, Z-Wave creates a low-energy mesh network that can be used to communicate with each other without Wi-Fi or Bluetooth.
4 Does Homebridge work with Z-Wave?
Yes, it allows Z-Wave HomeKit integration.