7 ways to add Tuya Devices to Apple HomeKit in 2024
I recently purchased a Lomota Smart Light Bulb, because it is cheap and plentiful. But unfortunately, it only supports Google Home and Amazon Alexa. I wanted to get them with iOS Home App and Siri. I found an awesome tool to connect my Tuya devices to HomeKit easily. Let's see how.
How to add Tuya Devices to Apple HomeKit
Tuya devices can be integrated into Apple HomeKit by using several ways. Following are two main solutions to doing.
01. Enomek [Recommended Solution]
02. Athom Bridge [Affordable Solution]
03. Software Based Solutions →
04. Hardware Based Solutions →
Let me break down some of the possible ways and the best way of adding Tuya products to your Home Kit. So, you can connect any smart home device to HomeKit using the following solutions.
Software Solution
Here are some software solutions to add your Tuya smart devices to Apple ecosystem.
1. Enomek [Recommended solution]
Enomek is the best solutions for those who want to add their Tuya smart home devices to HomeKit. Not only Tuya smart home solutions, you can also add any smart home devices to HomeKit.
Say goodbye to complicated setups and enjoy easy integration with Apple HomeKit in just a few taps. Download Enomek -HomeKit Enabler via the button below and enjoy Tuya Home Kit integration.
Step guide for Enomek App Installation
2. Homebridge
Simply, Homebridge is a lightweight server that is designed to unify your entire smart ecosystem under one simple control system.
This third-party software application can integrate with your home automation system to offer Apple Home integration for your smart home devices that don’t directly support Apple Home Kit Tuya.
If you want install the Homebridge and add devices to HomeKit yourself, you can do it simply using our complete step guide to adding Tuya devices to Homekit →
3. Home Assistant
Home Assistant is open-source software for Home Automation. It can act as a central hub for your Smart home devices.
It has a web based user friendly user interface and supported to Google Home and Amazon Alexa. You can use Tuya Home Assistant integration to add your SmartLife devices to HomeKit.
Hardware Solution
Here're the best HomeKit hardware solution you can buy. Let's see what're they.
1. Athom HomeKit Bridge (Affordable way)
This incredible solution comes pre-flashed with a specially compiled server that effortlessly connects with Siri. This is the cheapest way to add your Tuya devices to HomeKit and is designed with simplicity in mind.
If you're dreaming of a smarter home and want an affordable, hassle-free solution to integrate your non-HomeKit devices into HomeKit, look no further than the ATHOM HomeKit Homebridge Hub.
2. HOOBS
HOOBS stands for Homebridge out of the box which consists of a Raspberry Pi and the Homebridge software pre-install.
Also, it can integrate thousands of third-party accessories with HomeKit and is compatible with over 2000 accessories now. However, HOOBS is a bit more expensive solution than the other solutions. So, you can create HOOBS SmartLife integration easily.
3. Raspberry Pi
Raspberry Pi is a popular single-board computer with a low price tag. If you're going to run your Raspberry Pi over WiFi, you'll need to connect it to your home network.
4. Zemismart HomeKit Hub
Zemismart ZigBee hub supports Tuya standard ZigBee devices and control smart curtain, light, switch, sensor and many more in HomeKit. Also, you can control most Tuya ZigBee devices in Apple Home APP or in Tuya App with this Tuya Gateway HomeKit / multi-mode ZMHK 01 hub.
Now you know how to connect tuya to HomeKit. Let's see how to add Tuya ZigBee devices to HomeKit with Zemismart HomeKit Hub.
If you want to add any smart home device to HomeKit, you can use Enomek, Athom Bridge, Homebridge and HOOBS solutions.
Smart HomeKit Switch Solution - Tuya
If you're looking for HomeKit integration for switches that do not directly support Apple HomeKit. here is the good news for HomeKit users.
Yes! Smart HomeKit Switch Solution supports to Apple HomeKit. You can control your Tuya Apple Siri switches using the Home app and Siri on Apple devices such as iPhones and iPads.
Communication Capability: Wi-Fi & Bluetooth LE
Control Panel: Switch Public Panel
Features of Tuya Smart HomeKit Solutions
- Remote control
- Voice control
- Schedule
- Timer
- Tuya Smart Home Kit Integration
- Smart linkage
HomeKit Device Pairing-IoT App SDK-Tuya Developer
Smart Life App SDK allows your Apple HomeKit devices to work with both Tuya's and Apple's smart home ecosystems. You can add your Tuya devices directly to Apple Home App and connect them to the Tuya IoT Development Platform at the same time.
You can do following things with Smart Life App SDK:
- Add devices
- Bind devices
- Remove devices
- Reset devices
Find more : HomeKit Device Pairing-IoT App SDK-Tuya Developer
HomeKit Device Pairing-IoT App SDK-Tuya Developer
If your device has an embedded MCU (simulation debugging assistant), you can integrate your device with Tuya IoT platform and Apple HomeKit platform.
Find more : Wi-Fi HomeKit General Solution
Also, if you want to flash your device to work with HomeKit, you can use Tuya convert to HomeKit.
What Can You Do With Tuya-HomeKit Integration
Here're the benefits of integrating your Tuya-compatible devices with Apple HomeKit
- Control using Apple devices and Siri commands
- Automation and scenes
- Improved Security
- Many networking hardware modules have become accessible like Wi-Fi modules, Bluetooth modules, and ZigBee Modules
- Significant cloud advantages
- Can create customized application for you (with no coding)
- Covers all important categories of smart home devices
You can add any Tuya smart home products such as Tuya Zigbee hub, Tuya Smart Switch, Tuya Convert, Tuya Bulb, Tuya lights, Tuya Switch, Tuya Thermostat to Apple HomeKit using Enomek.
Not only Tuya Smart Home Devices, you can also add your Govee Devices to HomeKit and add your Dyson Devices to Apple HomeKit.
Adding Tuya devices to Apple Homekit using Homebridge
All you need to control your Tuya devices into Apple ecosystem.
- Tuya user Account
- Tuya Developer Account
- Tuya Smart Device
Before that make sure you have linked devices with your Tuya App. See how to configure on Tuya IoT platform. Let's see how to integrate Tuya Apple Home Bridge.
- Install Homebridge on Mac/PC
- Install Tuya Plugin
- Edit the configuration file
- Run the plugin
- Control devices on HomeKit
Follow our step guide to integrate your Tuya devices easily into your Apple Home.
01. Install Homebridge on Mac/PC
If you want to install Homebridge on Mac/PC, you can find our Homebridge setup guide to know the step guide. So, you can easily install Homebridge on your computer.
02. Install Tuya HomeKit plugin
Once installed the Homebridge, you need to install the Tuya plugin.
Step 01: First, open the Terminal on your PC or open the Homebridge UI
Step 02: Next, you can install the Tuya Homebridge plugin as given below.
Install the Tuya plugin using your terminal:
npm install homebridge-tuya-platformIt takes little time to install the Tuya plugin and after installation check whether the installation is successful.
Install Tuya plugin using Homebridge UI:
Step 01: Open Homebridge in your web browser using: http://homebridge

Step 02: Click on the plugin in the menu bar
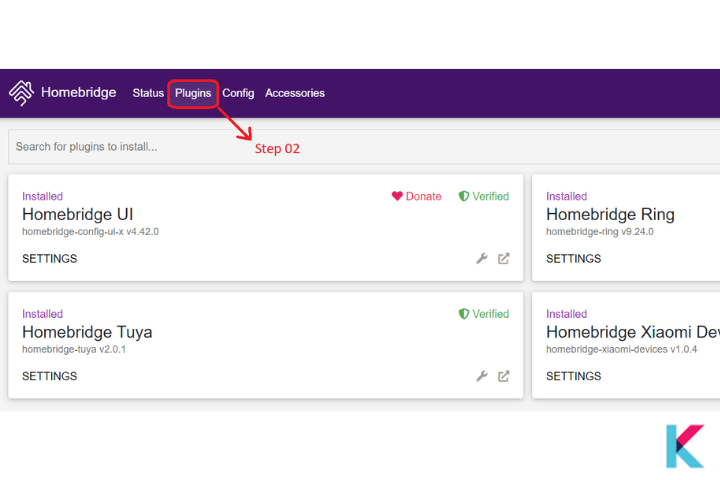
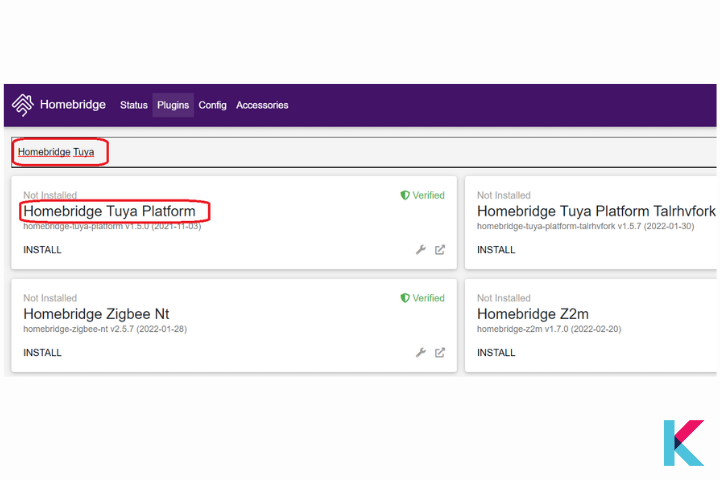
Step 03: Search in the search field for Homebridge Tuya as shown in the image
03. Edit the configuration file
Now, you have installed the Tuya plugin. Then, you need to edit the configuration file before you run the plugin.
Step 01: As the first step of editing the configuration file, you need to navigate to the directory using:
homebridge-tuya-platform/configStep 02: Next, edit the configuration file (config.json) as shown in the below image
Step 03: After then, you can specify values for options
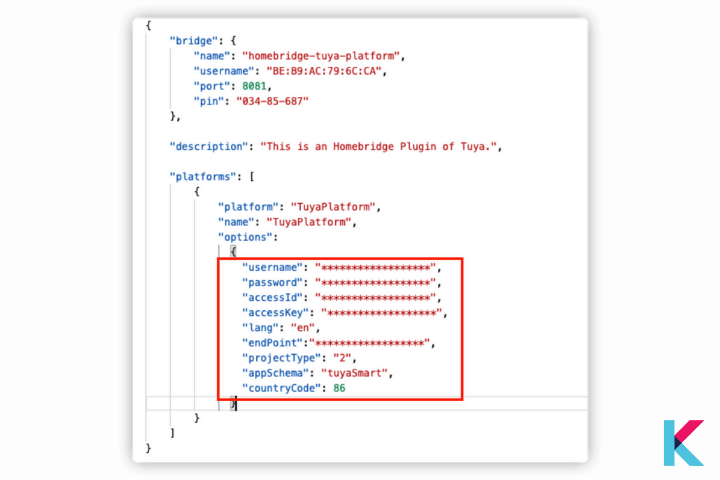
- Username and Password: In here, you can use the username and password of the Tuya Smart or Smart Life app.
- AccessId and AccessKey: You can user Access ID and Access Secret of your cloud project. To select the cloud project you have to go to the Tuya IoT platform. (Go to the IoT platform > Click Project Overview > Now, you can find Access ID and Access Secret)

- Lang: You can keep the default value.
- endpoint: As the endpoint, you can select the availability zone of your cloud project. (Available to the region of your Tuya Smart or Smart Life app account)
- projectType: As the projectType you can select the development method you choose (Note: When creating a project you choose custom development or Smart home PaaS. So, you can choose it as the project type)
- AppSchema: You can get the mobile app you used to link your devices on the IoT platform such as tuya Smart or smart life
- CountryCode: When selecting the country code, you have to select the code of the country you select on logging in to the Tuya Smart or Smart Life app
04. Run the plugin
Step 1: Before running the plugin, you need to navigate to the directory homebridge-tuya-platform using: cd ..
Step 2: Next, you can run the plugin using:
homebridge -D -U ./config/ -P ./05. Bridge to HomeKit
Step 1: Now, open the Home app on your Apple device
Step 2: After then, scan the QR code of the Homebridge UI to pair with Homebridge or you can enter the 8 digit PIN code. (Note: Find the PiN code in the configuration file)
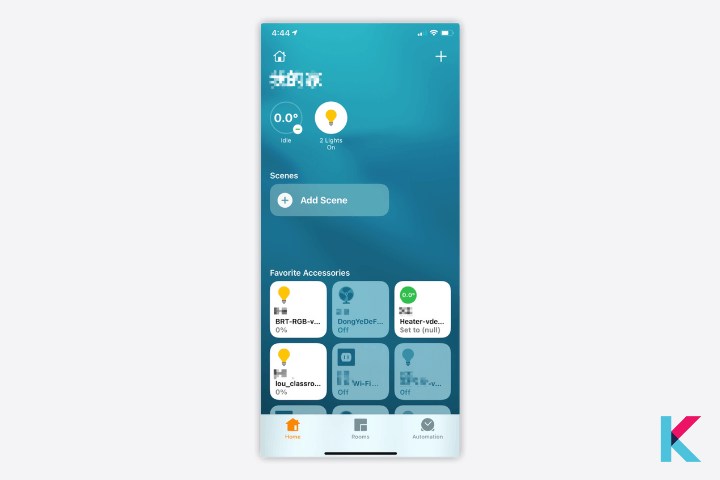
06. Control devices on HomeKit
After all, you can be able to control all your smart devices with the HomeKit dashboard.
This Tuya setup guide is important to control smart devices with HomeKit. Now let's see Tuya HOOBS Automation.
How to add Tuya devices to Apple HomeKit using HOOBS
After all you need to link devices with your Tuya App. Let's see how to configure on Tuya IoT platform.
- Connect HOOBS to your Home Network
- Open the HOOBS interface on your browser
- Install the Tuya Plugin for HOOBS
- Add Tuya accessory in Apple Home
01. Connect HOOBS to your Home Network
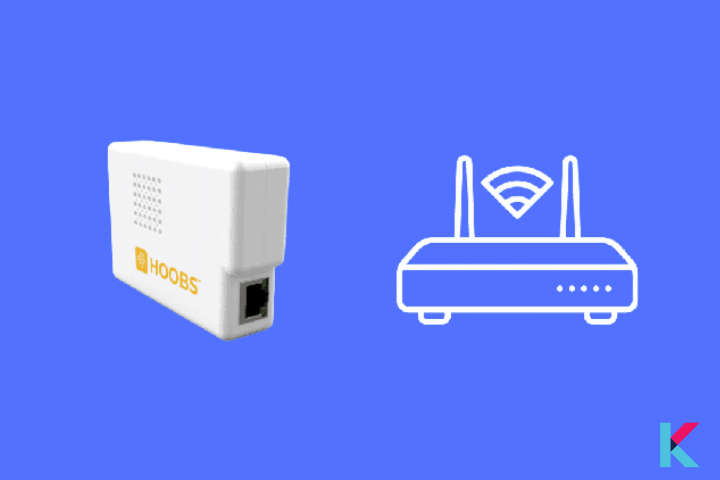
Step 01: Connect the HOOBS Hub to an electric socket
Step 02: Connect an Ethernet port to the router (Ethernet port at the back of the HOOBS Hub)
02. Connect the HOOBS wirelessly to your Wi-Fi network.
Step 1: Open the HOOBS interface on your browser
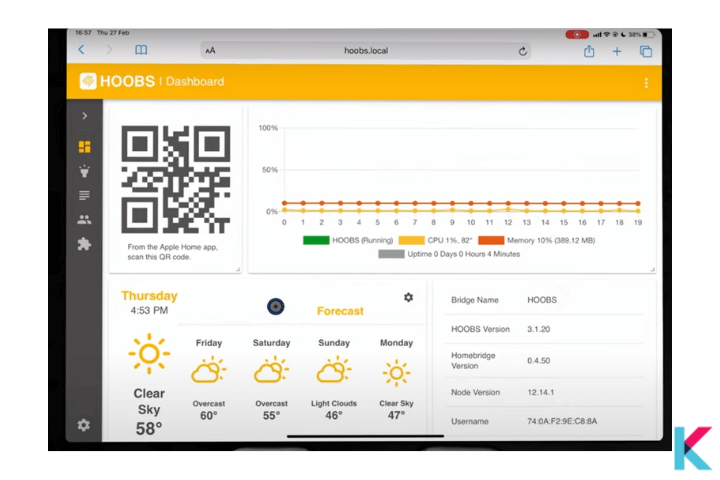
After then, you have to set up your HOOBS account on the local server once connected HOOBS to your home network. (Visit http://hoobs.local to do this).
Step 02: Once completed, you have to create an admin account. (Note: Enter your name, username, and password of your choice)
03. Install the Tuya Plugin for HOOBS

Step 1: Log in to your newly created HOOBS account
Step 2: Go to the Home window
Step 3: Click on the plugin icon and Type “Tuya Lan”
Step 04: Install the plugin using homebridge-tuya-lan
04. Configuration of the Tuya Plugin
Step 01: Visit the HOOBS Tuya Plugin page
Step 02: Copy the code provided under the subheading “Configurations”
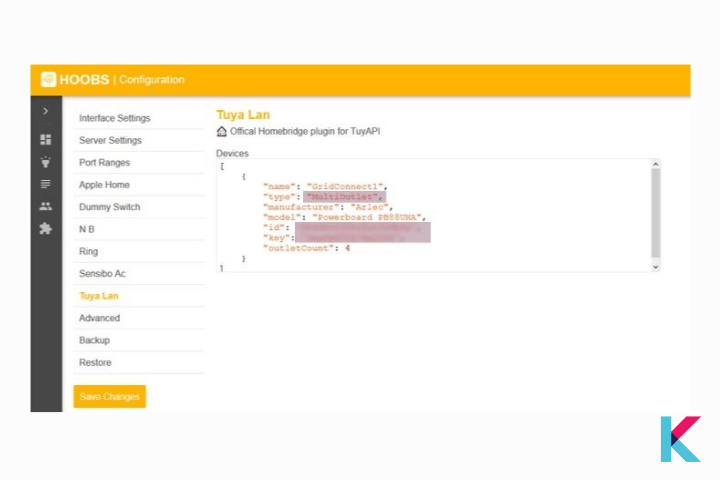
Step 03: Go Back to the Tuya Lan plugin installation plugin
Step 04: Click on the option “Installed Plugins”
05. Add Tuya accessory in Apple Home

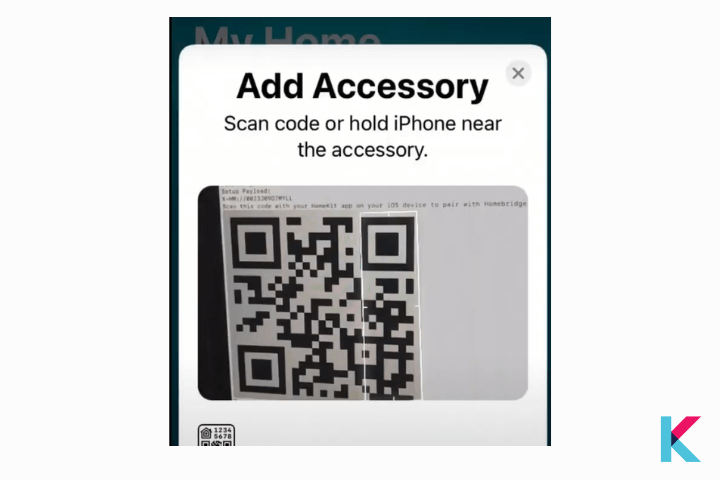
Step 01: Open Apple Home App on your Apple device
Step 02: Click on add accessory
Step 03: Choose “I do not have a code or cannot scan”
Step 04: Then, it’ll appear on-screen, and enter the eight-digit setup code to add them to Apple Home.
Step 05: If you want to find the setup code, you can find it on the HOOBS dashboard (under the Home Setup pin)
Then, your device is not HomeKit certified, you may get a warning (ignore it and add anyway)
If you like to get the HOOBS, you can get it via the link below.
Get HOOBS all in one for $312.48
How to add Tuya devices to Apple HomeKit using Raspberry Pi
All you need is supported Raspberry Pi Models, A 4GB or large SD card, and a Windows, macOS, or Linux computer with an SD card reader.
Steps:
- Download and Flash to SD card
- Connect to Network
- Manage Homebridge
- Connect to HomeKit
- Install and configure the plugin
1. Download and Flash to SD card
No sign up required to use Homebridge Raspberry Pi Image because it is completely free. You know what Raspberry Pi the imager is the easiest way to flash the Homebridge Raspberry Pi Image to your SD card.
Step 01: Download and install the newest version of Raspberry Pi Image
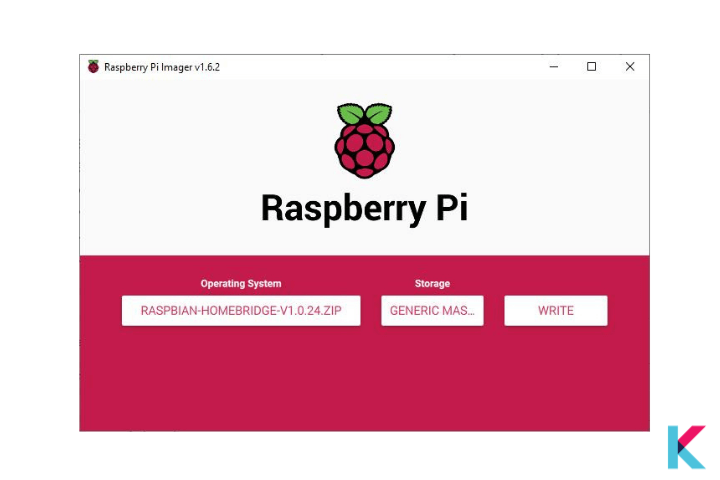
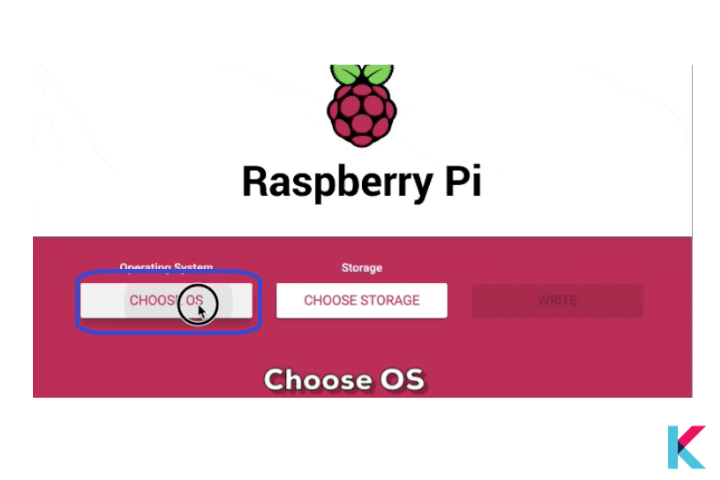
Step 02: Open the Raspberry Pi Imager Application
Step 03: Click choose OS
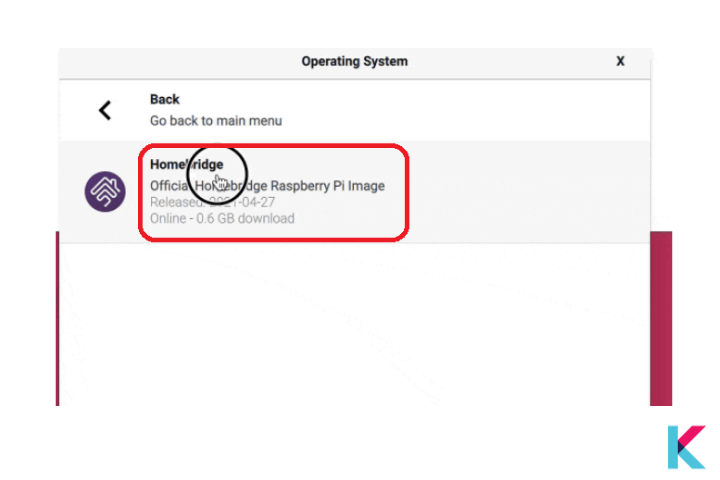
Step 04: Scroll down and select the “other specific purpose OS” category
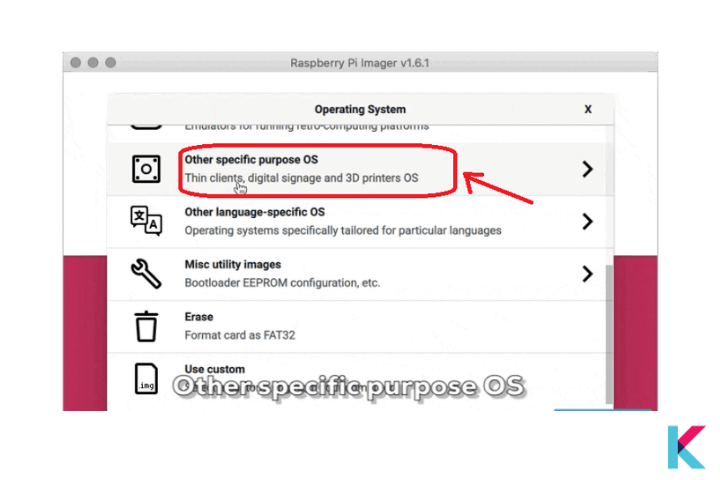
Step 05: Select Homebridge, then choose the latest Homebridge image
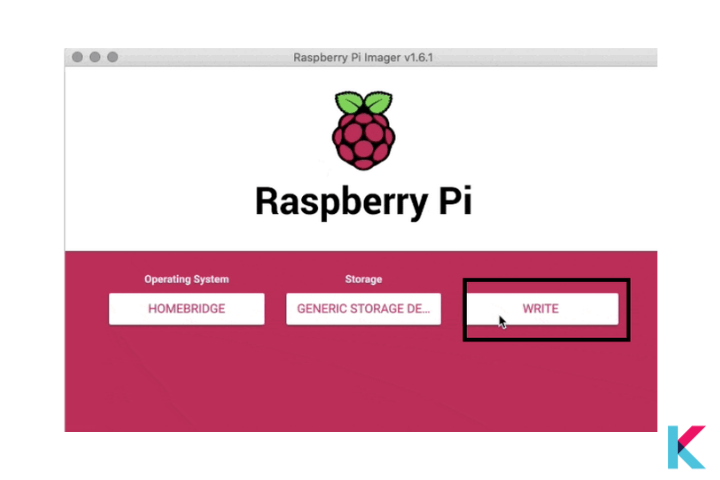
Step 6: Click Choose Storage and select your SD card
Step 7: Click Write
2. Connect to Network
Ethernet or WiFi are both options for connecting your Pi. Ethernet can be used to connect Raspberry Pi without additional configuration. You just need to turn on your smart device for the first time. If you want to connect your Raspberry Pi via Wi-Fi, follow these steps
Step 01: Power on your device (without an Ethernet cable attached)
Step 02: Scan for a new Wi-Fi network (Use your mobile phone)
Step 03: Connect to the hotspot named Homebridge WiFi Setup
Step 04: After a few moments open the captive portal and then you can connect the Raspberry Pi to your local Wi-Fi network.
3. Manage Homebridge
You can install, remove, update the plugin, and modify the config.json file of Homebridge using the Homebridge user interface. (Note: Default username and password are both admin)
If you’re a Mac user, you want to access the user interface via http://homebridge.local. Otherwise, if you’re a Windows user, follow these steps to find the IP address of your Raspberry Pi.
Step 01: Log in to your router
Step 02: find the “connected devices” or “dhcp client’ page:
You can use your iPhone to access http://homebridge.local (Note: once you login homebridge using the default username and password find the IP address under System Information)
Step 03: Then, you need to download the Fing app for iOS or Android to scan your network
Step 04: Once finished booting the IP address will be displayed on the attached screen, if you plug a monitor into your Raspberry Pi
4. Connect to HomeKit
Step 01: Open the Home app on your Apple device
Step 02: Tap the Home tab and plus (+)
Step 03: Tap Add Accessory, then scan the QR code
If you add accessories for the first time, you may get a message saying Additional Setup is required. So then, when you add a plugin, it appears in the Home App without any permission.
Easy ways to integrate your Tuya device with Apple HomeKit
There’re many ways to integrate your Tuya smart Siri devices into Apple Home. Here’re the 3 easy ways to integrate your smart life device into your HomeKit.
[Yesterday 10:00 AM] Ishara Fernando- Configuration by simply using Tuya email Credentials
- Using Tuya's official HomeBridge plugin
- Local control way
Using web and local keys, you can easily control your Tuya devices with your HomeKit Accessories . Let’s see How to get Tuya's local key.
Do you have Shelly devices and Apple HomeKit? Then, Then, you might be wondering how to add your Shelly devices to Apple homeKit. Let's see how.
Configure on Tuya IoT platform
Extracting device keys from the Tuya platform - Local Key configuration
You can control your devices locally without even an internet connection. You’ll need to have the TuyaSmart app installed on your Apple device and have an account set up before we do this.
If you haven’t a Tuya developer account on http://iot.tuya.com/, you need to create an account.
Create a project
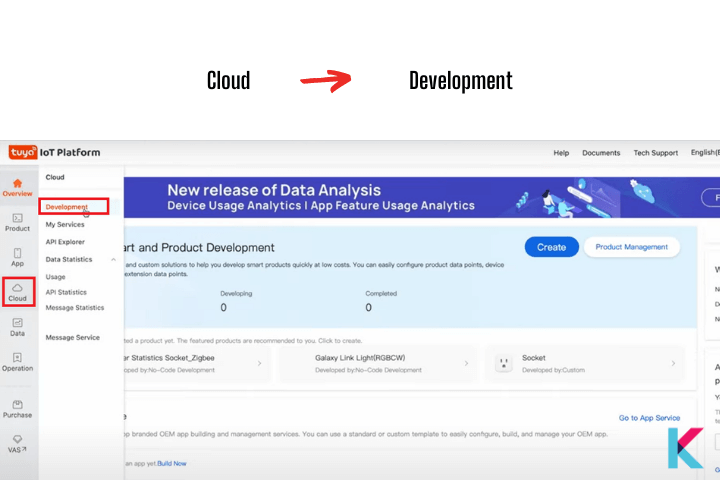
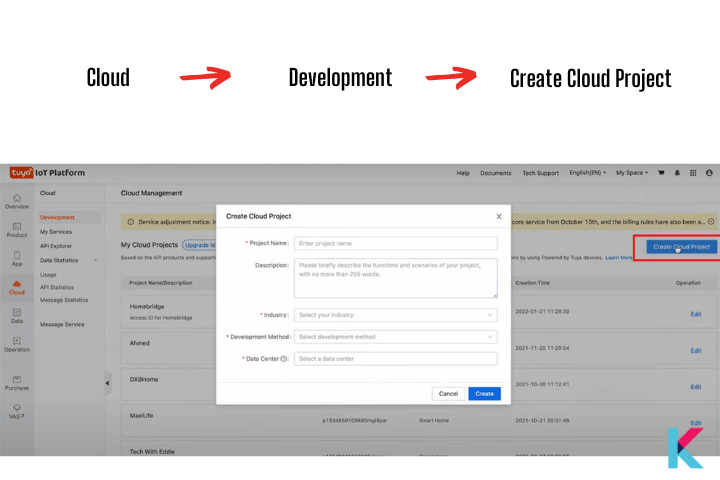
Step 1: Go back to the Tuya IoT Platform page, and now go to the created cloud development project (Cloud, Development, Create Cloud Project).
Step 2: After then, you have to fill in the details and click create button
Link account
Step 1: Once you created the cloud project, then we need to link it to our user account, With the devices, we want to control, we use the one on the app.
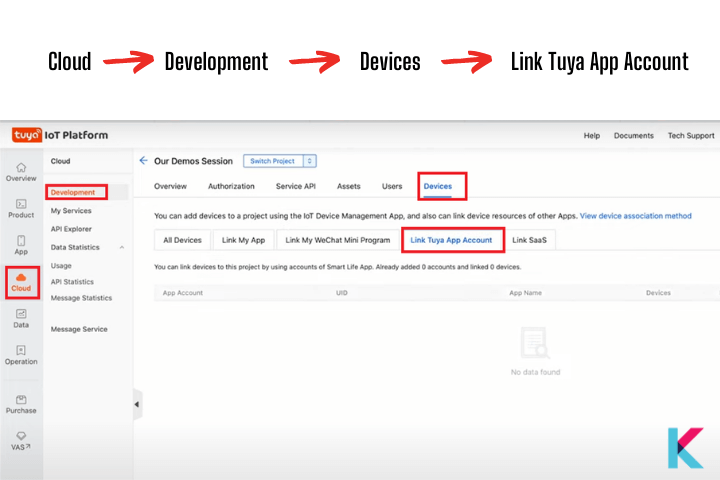
Step 2: Before linking your account, again go to the Cloud Development, and then Devices in Tuya IoT platform.
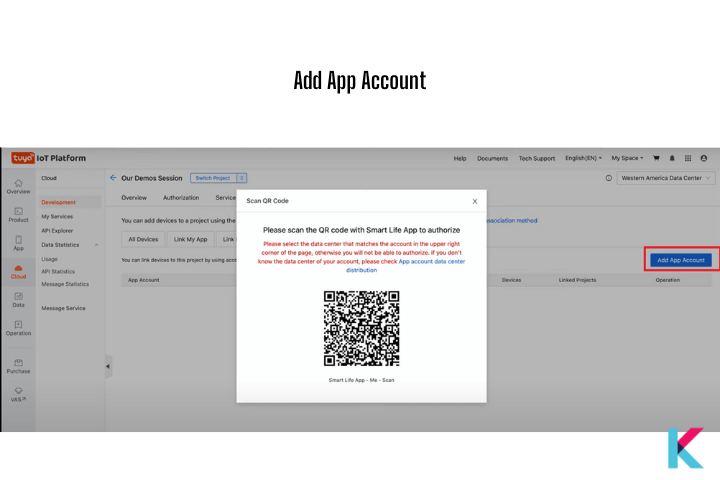
Step 3: Next, Select the Link Tuya App Account tab, and then you want to click Add App Account button on the right.
Step 4: You will see a QR code and go into your Tuya Smart app on your smartphone. Then you have to tap the Me icon, and then tap the [ - ] button. Now you can scan the code.
Step 5: These two accounts will be linked now. You can see it in the list on the website.
Extract the Device ID
You can see the device that has been added to your Tuya App.
Step 1: Go to devices in the IoT platform from the Development screen and select the created device
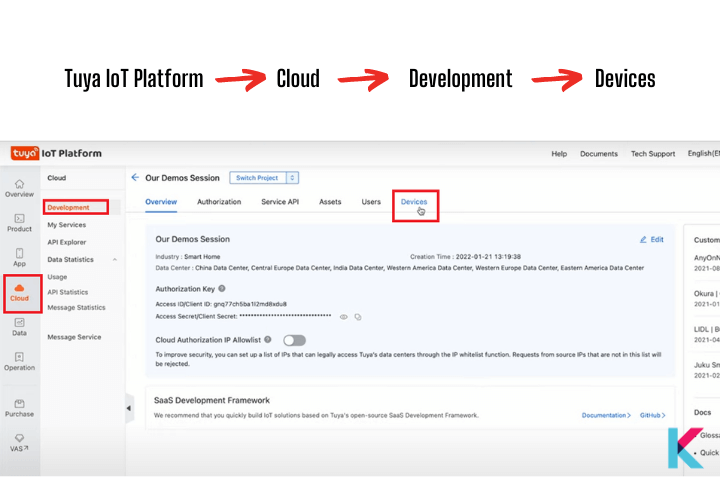
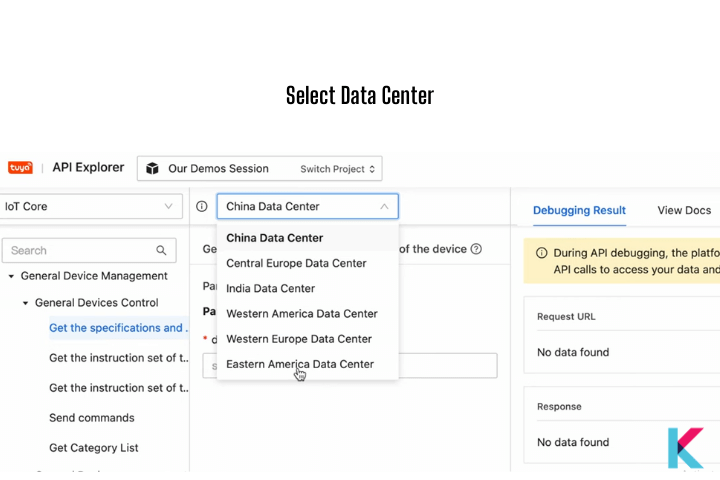
Step 2: Next you want to copy the device ID, and select the correct data center from the drop-down
Get device permission
Now, you have your device ID, but we need to add API permission before doing anything.
Step 1: Go to the My Services from the cloud menu and then click it.
Step 2: After you want to go to Click IoT core and you need to sign up for the trial edition plan.
Extract to Tuya local key
Now we have some API permission for our Device ID
Step 1: Now, got to the Cloud and then API explorer
Step 2: After then, go to Smart Home Management System, and go under device management, you can scroll down to get device details
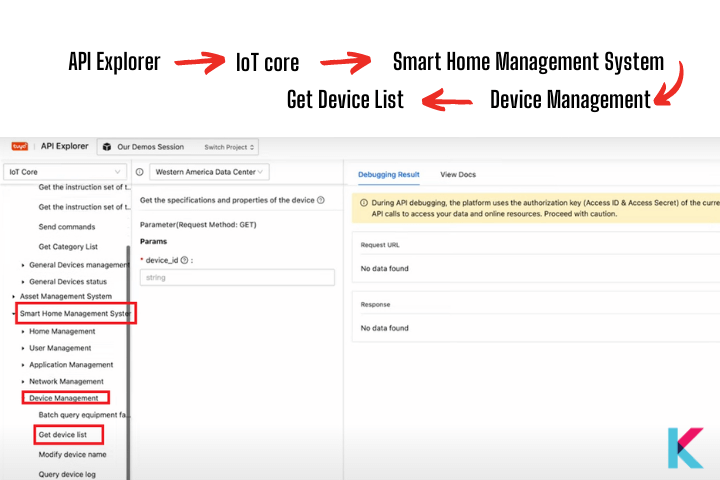
Step 3: Now, Copy and Paste the device ID and submit the request, after all, you can see your local key.
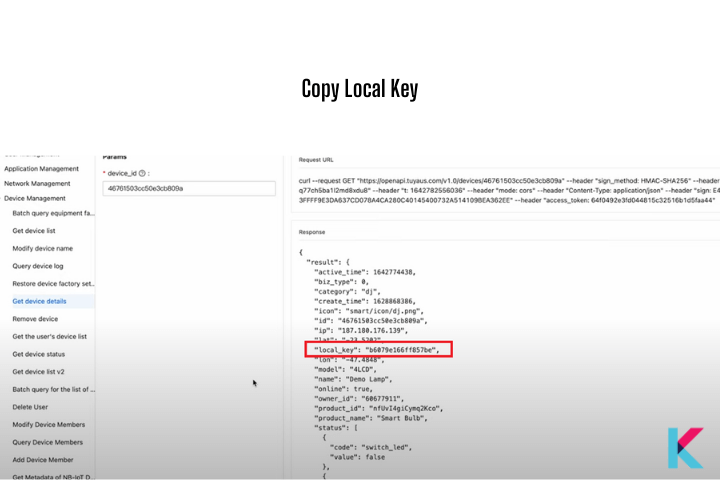
Step 4: Copy your local key along with the device ID for entering into our HomeBridge
Configuring the Tuya device
Step 1: Back to HomeBridge and select device type
Step 2: Give a name to your device, and then give Tuya ID
Step 3: Copy and paste the Tuya key into the local key
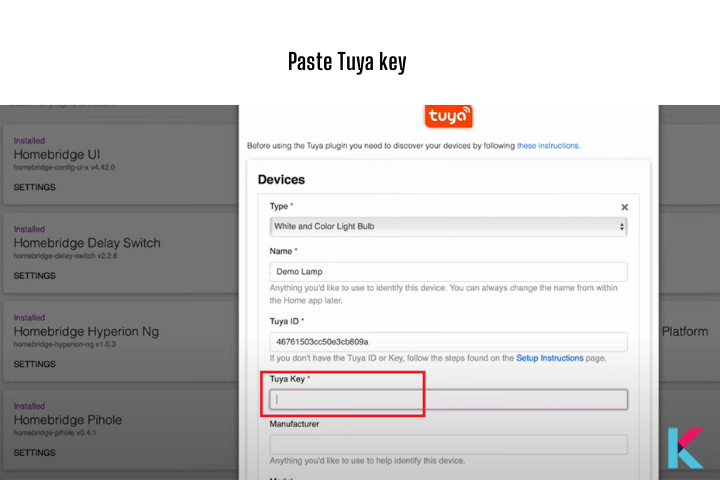
Step 4: After then, give manufacture, and fill other sections(If you don’t know how to fill other sections – go to GitHub issues and you will find device type, ) Click on save,
Step 5: Restart the HomeBridge and allow it to load all of its plugins
Step 6: Go to accessories, you can see your device here, Click on it to control your device using HomeBridge. If you go to my Apple Home app, you can also control it using Apple HomeKit.
How to use the Tuya HomeBridge web plugin to control Tuya devices in Apple HomeKit
We want to install the official Tuya Homebridge plugin so it will be possible to control Tuya smart devices using Apple HomeKit. You can use HomeBridge or HOOBS to integrate your smart life devices with smart Home Kit. Here’re the two easy ways.
- Configuration by simply using Tuya email Credentials
- Tuya dev configuration
Configuration by simply using Tuya email Credentials
You can simply control Tuya smart devices with HomeKit using Tuya email credentials. But you cannot control your device locally. You need to have an internet connection.
Let's see How to configure Tuya plugin using Tuya email credentials
We can control your Tuya device using the internet connectivity between the plugin and Tuya’s cloud.
This plugin uses your email credential and requires an active internet connection. Also, you can now control devices over your HomeKit. If you go through the plugin configuration, you can even go and expose these device types into this plugin.
Tuya dev configuration
HomeBridge Developing team has introduced a new HomeBridge plugin. They are actively supporting the Homebridge community. So, using this method you can easily expose to Apple. Configuration is different from the first way.
How to configure the Tuya development plugin - Steps
- Step 1: On Tuya HomeBridge developing teams web page, you can see the official plugin and device types that they support. (Small Home Appliances, Security and sensors, Electrician category, Lighting).
If you go to GitHub page open up an issue and they actively resolve it and try to assist you to enable that device into Apple HomeKit. They’re a very active community to configure this plugin - Step 2: Go and install Tuya HomeBridge Plugin. (Copy the header of the plugin- HomeBridge-Tuya-Platform).
Then go to HomeBridge plugins. Click install. It takes a few seconds. Once the plugin is installed, you want to fill settings of the HomeBridge tuya platform. (Username, password, country code, Access id, Access key). - To get other information, you can go to iOT.Tuya.com. And now you want to go to the cloud development tab
- Then, create a new project (fill and create), And authorize to follow API services device log and notification
- Next, You want to go to the Devices tab, and then link Tuya app account as in previous methods.
- Open up Tuya smart app on your phone, Click your profile, click on the scan account, then scan the account here, confirm login, and let’s go-to devices.
- Now, you can see the devices that you have installed. Then, you can go to overview.
- We need the access id for this plugin, so, you want to go to IoT Tuya Platform and go to the overview
- Select the platform as Tuya smart. And click on save. Once it is saved, you want to click on restart bridge
- Once the plugins are loaded you want to go to accessories, then you can see your device over here. you can control your Tuya device using HomeBridge or Apple Home App
This plugin uses your internet connection and that’s how it exposes all the devices Tuya web development and then exports it into Apple HomeKit.
If you're more into Ring Devices myQ Devices and Sonoff you can also find How to add Ring Devices with Apple HomeKit and How to add Sonoff Devices with Apple HomeKit articles here.
How to add Tuya devices to Home Assistant
Go to the Home Assistant Dashboard > Go to the configuration > Go to the integration > Click Add integration button > Search for Tuya > Enter your Tuya credentials (User name, password, Country code and Choose the App you use) > Click the submit button > You'll see the success message > Now, you can see your devices that you have registered to your account and can see scene that you have created within the App > Click finish > Then, your Tuya integration will be added to Home Assistant.
You can also create local Tuya in Home Assistant. This Tuya local Home Assistant integration is support to Wi-fi devices running Tuya firmware without going via the Tuya cloud.
Tuya Support for Matter Smart Home Standard
Now, you can solve the fragmentation problems and also eliminate the compatibility issues between different ecosystems. Tuya's latest smart home devices will support to Matter protocol. Matter-supported Tuya solutions provide triple security protection for their customers.
So, Tuya Tread Matter integration allows you to connect all of your Matter-compatible Tuya devices to any smart home ecosystem like Apple HomeKit, Amazon Alexa, Google Home, and Samsung SmartThing.
How to add Tuya devices to HomeKit with Zemismart Hub
There're two ways to add Tuya ZigBee devices to HomeKit. You can add the hub directly to Apple Home Kit and press the pairing button to add devices. Also, you can add the hub and its devices to the Tuya Hub.
You can do the entire integration in the Tuya app and next, you can scan the QR code through the Tuya App to import all of your Tuya Zigbee devices to Apple Home App.
- Connect the device via an Ethernet cable and power the device.
- You'll see green light and flashing red light.
- Open the Tuya App > Tap on the plus sign > Tap on Add > Tap on Next.
- Now, the hub is integrated into your Tuya account and your local network.
- Then prompted to add sub devices (Make sure the device is in pairing mode).
- Button pressed for 5 seconds (You'll see some blinking blue light).
- Tap on add sub devices (The hub'll scan and locate them).
- Rename the device > Toggled the configuration of the added devices.
- Once completed, you can scan the QR code through the device setting and add the device to the Home app.
- Follow the on-screen instructions.
How to connect the Matter Gateway with Tuya and HomeKit
- Press the set key until the indicator light flashes.
- When the indicator light flashes quickly, open the Tuya app to discover it.
- Add devices > Find the Matter Gateway > Add sub-devices here > Click share via Gateway > Get QR code > Copy it > Open the Home app after adding it.
- Find the Matter Gateway in the Home App > If you added Tuya ZigBee sub devices before, they'll show in the Home App automatically.
1. Zigbee RGBW LED Driver for LED Strip Lights
Features:
- The latest ZigBee 3.0 protocol
- Fully isolated design with over-current protection
- Control color, on/off, and dimming of your LED light strips
- Powerful Zigbee repeater
- High-quality smart lighting
You may get the Zigbee RGBW LED Driver for LED Strip Lights from Amazon for $69. Click the image below.


2. Smart Motion Sensor by Senckit
Features:
- Wifi PIR motion detector alarm
- 4 Arming modes
- Free alarm records
- Dual infrared detection
- Compatible with Alexa, Google and smart linkage
3. Smart WiFi Temperature Humidity Monitor
Features:
- Built in Swiss made smart hygrometer sensor
- Disply on Screen(Time, Date, Temperature, Humidity)
- Super High Coverage Range
- Intelligent Linkage Function
- Can be used indoors and outdoors
You may get the Smart WiFi Temperature Humidity Monitor from Amazon for $24.98. Click the image below.

4. Tuya Smart Life Security Camera
Features:
- 1080P Full HD with Superior Night Vision & Every Angle Covered
- 2 Way Audio & 2 Way storage
- Motion Detection&Auto Tracking Instant phone Alerts
You may get the Tuya Smart Life Security Camera from Amazon for $35.99. Click the image below.

05. Zemismart Tuya Homekit ZigBee ZMHK-01 Hub
Features:
- With Motion Sensor,Door Sensor,Temperature and Humidity
- Compatible with Apple HomeKit and Amazon Alexa
- You can turn on alarm mode when you leave the house
- Wireless Mini Contact Sensor
06. Tuya Mini Smart Switch
Sparkleiot Tuya Mini WiFi Smart Switch Relay is compatible with Alexa and Google Home. You can control any Tuya devices with Tuya or Smart Life APP. Also, it includes features like Smart Scene and State Memory.

Along with Matter we can expect HomeKit compatible Tuya products in the near future. Apart from that, you wish to know how to add myQ devices to Apple HomeKit , you can find more about myQ HomeKit.
FAQs about Tuya HomeKit
1 Does Tuya Natively Support HomeKit?
We all know Tuya doesn’t support HomKit natively. Tuya is a third-party manufacturer. So, it is hard to get approval for the “works with HomeKit” label because of the specific set of guidelines of Apple. But we can expect “Works with HomeKit” label in the future. Now, we can't find any Tuya devices with HomeKit support.
2 What is local Tuya?
You can handle Tuya devices locally without an internet connection. Home Assistant can handle devices based on Tuya locally through a custom integration. By using push updates rather than polling, this custom integration updates device status more quickly.
3 Can Tuya work with HomeKit?
Tuya is not compatible with Apple HomeKit. You can download Tuya Smart App on your iPhone or iPad, then control the device via Tuya Smart App.
4 How do I set up local Tuya in my Home Assistant?
You do not need a HOOBS hub or HomeBridge to add and configure Tuya to your home assistant. You can add it directly from Configurations->Integrations->Add Integration->Tuya.
5 What can you do with Tuya HomeKit integration?
Tuya offers a variety of networking hardware modules, including Wi-Fi, Bluetooth, and ZigBee modules, which are now available to you with Homekit.
With Tuya integrated with Homekit, you gain significant cloud advantages. This company offers a huge, highly encrypted cloud service that is incredibly fast. It can also be accessed from over 200 countries around the world.
Tuya, when integrated with your Homekit, can potentially bring out the app developer within you. Tuya allows you to create an application for yourself without any coding skills required.
Tuya can be integrated with Homekit to cover all the necessary categories of smart home appliances including lighting, electrical equipment, security products, primary, and even small appliances.
6 Does Tuya use Zigbee?
Yes. Tuya Smart devices use Wi-Fi as well as Zigbee. So, you can buy not only Tuya WiFi products but also ZigBee 3.0 smart products. They are compatible with the ZigBee gateway hub. Do remember, you can customize your systems as you wish. It is depending on your individual needs and security requirements. Also, you can use Tuya Zigbee Apple HomeKit devices using Tuya Homebridge.
7 Can you connect smart life to HomeKit?
You can control Smart Life devices on Apple’s HomeKit using open-source software. And you can add Homebridge to HomeKit via the Home app on iOS. Get ready for automation on your Tuya smart life apple Homekit.
8 Is Tuya and smart life the same?
Yes. Both Tuya Smart App and Smart Life App are official Tuya App. But there is only one difference between these two apps. Tuya Smart App uses the Tuya logo and elements, But the Smart Life App doesn’t use the Tuya logo and elements.
9 How do I connect to Tuya Smart?
All you need is HOOBS hub or any third-party software or simple hardware solution to connect your Tuya Smart to HomeKit.
10 Is Tuya Smart safe?
Yes. You can trust the Tuya Smart as it is one of the most secure smart home systems (Strict adherence to Data privacy rules and regulations and a highly encrypted user interface).
11 How do I add Tuya to Home Assistant?
You can add Tuya to Home Assistant simple as one, two, three. Go to the Configurations->Integrations->Add Integration->Tuya.
12 Does Smartlife work with HomeKit?
The answer is yes. You can control your Smart Life smart products with your iPhone, iPad, or Mac.
13 How to add Tuya Smart Camera to HomeKit?
Adding Tuya Smart Camera to HomeKit using is easy with Enomek. Only you need to do is download Enomek app and follow the step-by-step guides. Tuya Smart HomeKit compatibility is easier than you might think right now.
14 Can you add Tuya smart Switch to HomeKit?
Yes. You can integrate your Tuya switch with HomeKit using Enomek. Not only Tuya smart switch, you can also add Tuya Plug, Tuya lights, and Tuya Extender, to Apple HomeKit.
15 Is Tuya compatible with Matter?
Yes. Tuya launches its newest smart home devices that will support Matter. So, you can find matter compatible Tuya smart devices now.
16 Is Home Assistant compatible with Tuya?
Yes. Except for the lock and remote platform, all home assistant platforms are supported by Tuya integration.
17 Can Zigbee work with Tuya?
Tuya isn't compatible with ZigBee by default. You can add ZigBee devices to HomeKit with the Enomek and you can also use Homebridge, Zemismart Hub, HOOBS etc.
18 Does the IKEA Dirigera hub work with Tuya products?
IKEA's New DIRIGERA Smart Hub is Matter-Ready. You'll need a ZigBee Hub to connect IKEA devices to Tuya Home. Therefore, it is possible to combine IKEA Dirigera Tuya.
19 Does HOOBS support HOOB a connection with Smart Life?
Yes, you're able to use HOOBS with Smart Life and create Hoobs Smart Life integration easily.
20 Are all smart devices compatible with HomeKit?
No. Most smart home devices don't work with HomeKit.